
This month, we'll take a look at graphics, the graphic display, and animation techniques I'm using in my CRPG.
First, a bit of background... (no pun intended!)
For my CRPG, I wanted the best possible color and graphical resolution on the TI-99/4a. To accomplish this, I use TI's bitmap mode. Unlike other microcomputers of the era, the TI had the ability to project all 15 potential colors on the screen at one time, which allows it to generate colorful images not possible on most other systems.
However, it has three serious limitations in bitmap mode:
The TI's video chip, the TMS9918A, has a maximum resolution of 256x192 pixels. It's actually a little narrower than average; the Apple II series had 280x192 screens, and the Atari and Commodore were 320x192 screens.
The reason for this is the TI was designed around a 32-column display; other computers were based on a 40-column display. So the TI's screen look cramped in comparison to other microcomputers, more like a console machine than a computer. (Not as bad as the VIC-20, though.) The TI does have a 40-column mode, but it's hardwired and just shaves the characters down to 6x8. You could make your own 40-column mode in bitmap, (one TI word processor even made a 64-column mode) but I'm taking the path of least resistance and using the standard display.
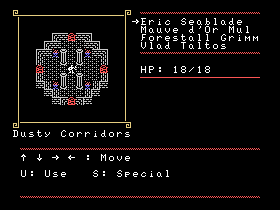
The TI also lacks a huge "off-screen" buffer around the display, which you can see prominently on Color Computer, Atari, and Commodore 64 displays. This can be an advantage; Tunnels of Doom's 3D engine fills the screen, really giving you a sense of being there. However, on standard TV screens the far left and right columns tend to get cut off. That is why TI BASIC's print commands are built around a 28-column display, to compensate for the cut-off. I've had some complaints about 32-column displays I've done that couldn't be seen. So I plan to use 30-column displays on my game, this should, at worst, only cut off half a character on either side.
The TI-99/4a uses an NTSC video interface, which can be hooked up to any composite video plug-in. (I find it ironic that modern TV's can now act as monitors for old computers!) This wasn't unusual for the time; most microcomputers were designed with "cheap" interfaces that could render well on a television screen. Only high-end personal computers, like the IBM, required an actual monitor because 80-column screens are impossible to see in NTSC.
 NTSC doesn't generate a clean crisp image. Vertically, it's pretty good, as NTSC is processed in horizontal sweeps. But when it has to change from one color to another in a horizontal line, a "fuzz" is generated. This makes the pixel look more rounded. I've heard that PAL generates a slightly cleaner image than NTSC, but I haven't actually seen the two side-by-side, so I can't offer any definitive judgements.
NTSC also has trouble rendering a single pixel distinctly. Two light-colored pixels of any color, for example, appear to be the same against the same background color. Try and identify the exact colors of the stars in Parsec, and you'll see what I mean! Checkerboard pixel patterns tend to generate a shade rather than a distinct pattern; a mix of colors create a "muddy" look. If you have at least two adjacent pixels of the same color, they can generate enough strength to be clearly one color.
 I've also noticed what I call the "color band" effect. Every horizontal column on the screen appears to have a color "taint" of either red, blue, or green. You can see this effect on the NTSC image of Parsec to the right. If you move a single character or pixel horizontally, it changes the color band it's in. If you have a large number of the same character along multiple columns, you'll notice they don't all look quite alike, because each one's fuzzy areas are a different color. In some cases, it even makes the graphics look a little slanted. With colorful graphics, this has a curious and chaotic effect which can be either pleasing or weird.
It isn't a bad thing to not have a perfect rendering. The important thing is to just make sure that the player can tell the dangerous spots to cross from the safe ones, without having to strain their eyes. After studying some of my graphics on an NTSC display, I made alterations to compensate.
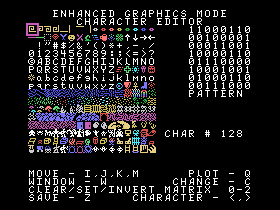
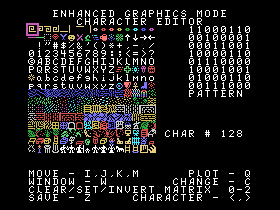
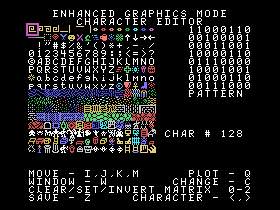
The TI-99/4a makes use of the extended ASCII character set, with 256 different characters. Unlike other microcomputers, you have complete freedom to redefine them as you will. The upper half of the set is used for game graphics, the lower half is letters, numbers, grammar, icons, and various border graphics.
Games such as Ultima actually use a fairly wide tile, equivalent to 2x2 characters in size. This gives you adequate resolution to make tiles distinctive. It also burns four times the amount of memory to store a single unique tile. That would limit me to 32 unique tiles, unless I wanted to buffer the data elsewhere and load them as needed, a time and memory-consuming process.
I decided early on to only use single characters for tiles, at least as far as traveling on maps was concerned. The reasons were:
So one question that has come up is, why do CRPG's render maps the way they do? Well, they owe a lot to maps from popular fantasy novels. In particular, Tolkien's work in the Hobbit and Lord of the Rings, which are drawn in a way that an artist may conceptualize what they see.
For example, old maps are drawn from a bird's eye top-down perspective, and yet features such as mountains are drawn from the line-of-sight of someone from a ground, looking straight at them. Early maps needed to indicate what a viewer would see, like a photograph. Modern maps are a more realistic assessment of the lay of the land with contour lines, but are definitely not as artistic.
So, when you look at a map of tiles, it's not so much a rendering of a bird's eye view, but a series of icons that indicate terrain types. The icons do have a degree of 3D to them, though. It's like you're seeing the world as a slanted plane, with objects sticking up like cards.
It's important to stay with one form of perspective. I was challenged in this because I didn't want to use a great number of tiles for things like walls. A true-perspective wall can use a lot of tiles to build. I eventually cut it down to five tiles per wall section in my building and dungeon sets: front, left, right, upper-left corner, upper-right corner. Cavern walls take up a few more, but the effect is very nice. Not everything is "true perspective"; Doors and furniture are all from a front-perspective. It's not realistic, but it works as an icon.
Color was a difficult challenge. I discovered that 15 colors is, in fact, not a lot. I had to choose colors carefully to ensure good contrast between various tiles, and that they were distinct in both emulation and on an NTSC display.
For example, I originally had my foothill tiles in dark and light yellow. Then I discovered on NTSC that you couldn't really see the color differences. They also didn't appear very distinct against desert tiles. My solution was to change the light yellow to dark red. On a crisp emulation display, it seems a little jarring. But on an NTSC display, it's subdued, and even comes close to making the hills seem more "brown".
Another issue was cliff tiles. I had planned to make them dark red, but paired with green tiles, it didn't look that great. So I made them magenta instead. It's a color that's rarely used in my graphic sets, so it makes cliffs more prominent, which I want them to be.
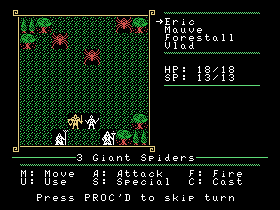
I also tried to keep color types consistent. I only use white almost exclusively for moving objects, like monsters or people. That way, you can pick them out quickly on the screen. Objects of interest, such as signs or villages, are in light yellow. Ruins are in cyan, which is otherwise rarely seen. And orange is used for roads, which lets them stand out nicely.
Currently, I have seven different character sets: world, town, caverns, building, dungeon, combat, and portraits. There are some tiles that are in common in all sets, and others that are only in one or two. I tried my best to ensure the same graphic shares the same tile across all sets, but it wasn't always possible. Five of the seven are shown below.
One thing I did, since I had such a wealth of characters to use, was abandon the idea of "one tile type, one tile". Why have one grass tile when you can have two? The advantage to it is that by mixing them up, it creates a much more "real" image, and it less blocky and angular-looking. I found that it helps break up the "banding" effect in NTSC as well.
As a side point, I did draw 95% of the graphics myself, only borrowing about a half-dozen from other sources. I guess that's my artistic side showing. If I took the time to practice, I could probably get to "not half-bad" at drawing with a pencil. Which I may need to do, if I want the manual to have illustrations...
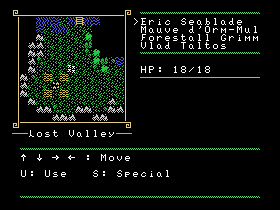
 The world set contains graphics only seen on the main world maps. It is also the only set with "party" tiles, showing 1-4 party members. I got this idea from Avernum, which would show your party in small-scale on the world map. The world set has single-tile forests and jungles, where the others have them at bigger scale. It is also the only set with mountains, which would be out of scale on a town or cavern map.
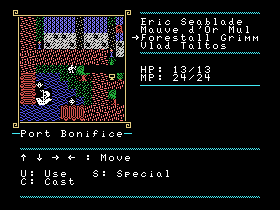
 The town set has graphics for when the characters are in a town or settlement. I had a real quandary to overcome with this set, whether or not to have building floor plans laid out on screen, like Ultima does. The problem is that floor plan designs eat up a lot of space. And I noticed that in other games, they're usually very empty except for a single person to transact with. And don't get me started on wall blocks with letters to spell out the names of businesses... what a waste of graphic space! I decided to use depict buildings in smaller scale, with walls, roofs, windows, and doors, similar to the Magic Candle or Final Fantasy.
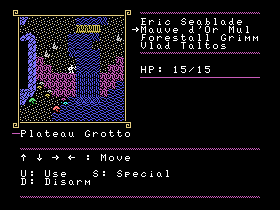
 The cavern set has graphics for underground areas. For awhile, I had the cavern and dungeon set combined, but I eventually split them off. That way I can diversify the cavern set to be more interesting. I added mushroom graphics, stalagmites, boulders, mine tracks, mine carts and other things you may see in a cave or mine. I may end up dropping some tiles that I copied over from other sets (who needs bookcases in a cave?) and making up some new ones.
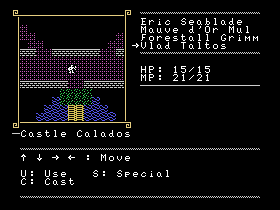
 The building and dungeon sets are very similar. As the names denote, they're for the interior of buildings. Anything to a small hut to a huge castle, a small basement to a massive underground complex. A great number of tiles are decorative, with beds, chairs, desks, tables, and so forth, for a better illusion of life. There's also some nice things like switches and portcullises for dungeon puzzles. And, of course, a treasure chest tile. Can't have too many of those...
The combat set is used to create battle maps. It has a smaller number of tiles available, as I had to reserve quite a few for player and monster graphics. (Sprites are no problem, they get a whole 256-character set of their own.) I plan to offer the ability for a user to create his own player graphics if he likes, and plenty of stock ones to choose from. Currently, I haven't fully developed the set yet, as the combat engine is still in the design stage.
The final set is the portrait set, which, like the combat set, is in design. It is used to create artistic portraits for when a player interacts with an object. It could be a transaction with a shopkeeper, opening a chest or door, or talking to an NPC with a complicated quest. This helps add some verisimilitude to the game's engine, and I rather liked the ones that Legends featured.
As equally as important as the graphics for the game is the layout and design of the user interface. This is not an area to screw up in. You could have the best game play there is, but if the player can't figure out your controls, he'll quit in disgust.
The nature of how you display information is the first step in a good UI design. Never be afraid to change something, try something new, or remove something that isn't working.
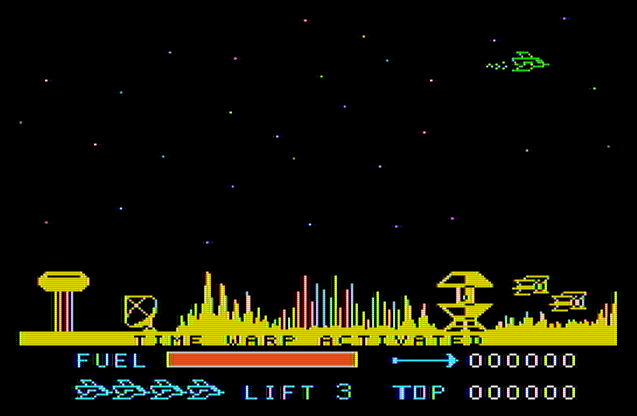
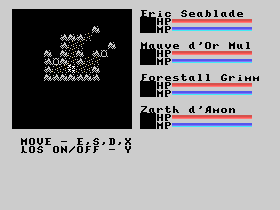 For example, I had planned to use colorful "bars" to represent your hit points and magic points. You can see my initial designs in the image to the right. If a stat was at maximum, the entire bar is colored. If it's below, then you can visually see how much you have remaining. A nice concept that also let me show off the color abilities of bitmap mode.
So why did I take it out? The problem was the graphic requirements. I wasn't drawing lines on screen like an Apple II or Color Computer would, the bars were using characters. I needed 4-8 characters to generate a dynamic display of a single bar color. After I'd done three color bar types, I'd used up nearly all my available characters.
I also realized one serious problem. Let's say you wanted to cast a spell that cost 20 mana points. At a glance, do you have enough? Well, if there's just a graphic bar, you don't know, unless you know exactly what the maximum is and make an estimate. This is not exactly fun to do in the middle of combat.
The solution to that problem is to have the values in numeric form on screen as well. Then my screen was looking very crowded. And the bars became redundant. I realized the space they took up could be put to better use. So I dropped them so I could use the characters they freed up in better ways.
One graphic UI element I have introduced is state icons. Characters in CRPG's can have a variety of states, from living to dead, poisoned to blessed, drunk to paralyzed, and so forth. States are tracked easily enough behind-the-scenes, but how does the player know what state a character is in?
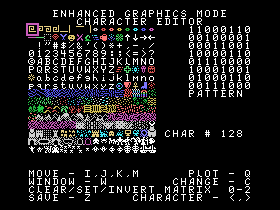
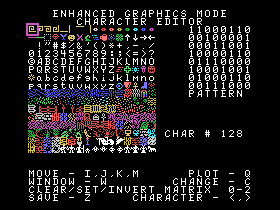
![]() You could, of course, use letters or numbers to indicate states, like Ultima does. (G = Good, P = Poisoned, D = Dead, etc.) But I decided on something more artistic, and used graphical icons instead. You can see them in the image to the right. Some of them are a little abstract, others are more obvious; a symbol key will be necessary in the manual. But it's a lot more interesting than a single letter.
You could, of course, use letters or numbers to indicate states, like Ultima does. (G = Good, P = Poisoned, D = Dead, etc.) But I decided on something more artistic, and used graphical icons instead. You can see them in the image to the right. Some of them are a little abstract, others are more obvious; a symbol key will be necessary in the manual. But it's a lot more interesting than a single letter.
Color balance is an important consideration, especially between the UI elements and the game content. I decided that I wanted my game graphics to have a universal black background. My reasons were as follows:
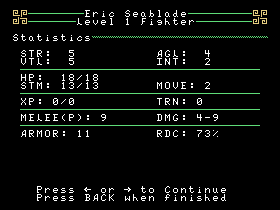
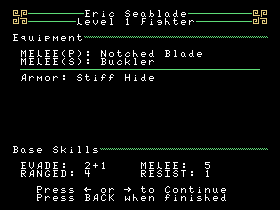
So what will the game actually look like in play? Well, for your entertainment, I've put together some mock screen shots of the game. Naturally, nothing is finalized, and I welcome any feedback. The combat screen in particular needs some work...
 |
 |
 |
 |
 |
 |
 |
 |
Animation is always neat to see, especially on vintage systems. It's not easy to do, but the effect is amazing. I don't think many 99'ers realize how easy it is to animate graphics, probably because it doesn't work well in BASIC or Extended BASIC.
For my CRPG, I wanted to animate some tiles, water in particular. So I made two water tiles for both shallow and deep water, and rotated them in a rough circle, to give the suggest of "waves". I also created rivers and waterfalls that moved in all four cardinal directions. This allows me create an authentic river system on maps. I also intend to have boat travel in game, and the player can actually sit back and let the river carry him where he wants. There's also a whirlpool that rotates around, and shoals that move up and down slowly to suggest water breaking upon them.
I used to have slow-moving lava rivers, but I dropped these in favor of fast-moving waterfalls. Lava rivers are, after all, rather rare, where waterfalls are plentiful. I think I got the idea from Revenge of the Sith.
I also have two "color" rotations. One is the magical gateway, which is in rainbow colors. The other is a "force wall", which has light-to-dark colors that shift about. Originally, I had made the gate a cross-hatch pattern of pixels. But it looked terrible in NTSC, like a muddy brown splotch, so I made the gate more solid horizontally, which fixed the issue.
For animation on the TI, your best tool is the user-defined interrupt. Interrupts are used by the TI for tasks that are "to the side", as it were, of the primary tasks.
A lot of standard TI activities are actually done on interrupt, such as:
INTLOC DATA USRINT
.
(start of program)
START  LWPI WS
       MOV  @INTLOC,@>83C4
.
USRINT (user interrupts)
       RT
Generally, you should preserve whatever was in the ISR hook address, as something else may be running a user-created interrupt. I think this would only really be an issue with a shared work environment and multiple programmers, though. I haven't had any trouble just loading my own interrupts and not saving the prior value.
       LIMI 2
       LIMI 0
This will turn interrupts on and off very briefly. It's important not to leave interrupts on; doing so can cause all sorts of trouble, especially with VDP access. You must also place the interrupt on/off code anywhere that you have a loop. I usually find right after a key detection sequence is the best place, since this is visited frequently and often.
For any animation, you need a clock of some kind. Otherwise, how else do you know when to change pattern?
The TI has a built-in clock already, the VDP interrupt timer. It counts from 0-255 in 1/60 second increments, and is used to time when the screen must blank. The only problem with it is that it does get reset occasionally. So what I do is make my own clock as a user interrupt. Since interrupts are checked every 1/60 of a second, it keeps perfect time.
Here's the code:
COUNT  DATA WS,CT1
CT1    INC  @CLOCK
       RTWP
I use a whole word for the clock value because words are quicker and easier to deal with than bytes. Unlike the 8086, the TI doesn't have half-registers, which is unfortuante. If you want to manipulate bytes over words, you have to either swap bytes (SWPB) or use shift instructions to move them about.
Animation can be done with two different methods, data-based or algorithmic.
Data-based is exactly what it sounds like; each frame of animation is stored somewhere in memory, and when necessary, the correct pattern is swapped in to replace the old one. This is especially useful for frames that have little or no similarities, or if the algorithm that could do the job takes up too much memory or time to utilize. The Ultima games from III to V feature animation. In fact, most of their boasted "increased tile count" comes from just adding animation frames to existing stills.
Algorithmic is more complicated, but also much more flexible. The pattern is recalculated on the fly using an algorithm. This has the advantage of allowing any pattern to be altered, and can be very cost-effective in memory. The downside is that you usually can't do complicated pattern changes, especially on a vintage system like the TI, without some severe computational costs.
For my CRPG, I have four processing algorithms. (I used to have five, but I changed one to data.) They are:
* R1 contains offset address in WORK buffer where pattern to animate is located.
* WORK+128 is an empty space to load the results.
AROT   LI   R2,WORK+128
       LI   R6,WORK
       A    R1,R6
       CLR  *R2+
       CLR  *R2+
       CLR  *R2+
       CLR  *R2
       AI   R2,-6
       LI   R3,>0100
AR1    LI   R4,8
       MOVB *R6+,R5
AR2    SLA  R5,1
       JNC  AR3
       SOCB R3,*R2
AR3    INC  R2
       DEC  R4
       JNE  AR2
       AI   R2,-8
       SLA  R3,1
       JNC  AR1
       LI   R6,WORK
       A    R1,R6
       LI   R2,WORK+128
       LI   R3,4
AR4    MOV  *R2+,*R6+
       DEC  R3
       JNE  AR4
       RT
After I wrapped up my animated choices, though, I realized I had only a single pattern that was being rotated. To store four iterations of that pattern would take up 32 bytes of memory. The algorithm takes up 72 bytes, and takes a not-inconsequential number of machine cycles to run. So I decided to drop the rotation code and just use the patterns instead.
* R1 contains offset address in WORK buffer where pattern to animate is located
ANORTH MOVB @WORK(R1),R0
       MOV  R1,R2
       MOV  R2,R3
       INC  R3
       LI   R4,7
AN1    MOVB @WORK(R3),@WORK(R2)
       INC  R2
       INC  R3
       DEC  R4
       JNE  AN1
       MOVB R0,@WORK+7(R1)
       RT

* R1 contains offset address in WORK buffer where pattern to animate is located
ASOUTH MOVB @WORK+7(R1),R0
       MOV  R1,R2
       AI   R2,7
       MOV  R2,R3
       DEC  R3
       LI   R4,7
AS1    MOVB @WORK(R3),@WORK(R2)
       DEC  R2
       DEC  R3
       DEC  R4
       JNE  AS1
       MOVB R0,@WORK(R1)
       RT

* R1 contains offset address in WORK buffer where pattern to animate is located
AEAST  LI   R3,8
       MOV  R1,R2
AE1    MOVB @WORK(R2),R4
       SWPB R4
       MOVB @WORK(R2),R4
       SRC  R4,1
       MOVB R4,@WORK(R2)
       INC  R2
       DEC  R3
       JNE  AE1
       RT

* R1 contains offset address in WORK buffer where pattern to animate is located
AWEST  LI   R3,8
       MOV  R1,R2
AW1    MOVB @WORK(R2),R4
       SWPB R4
       MOVB @WORK(R2),R4
       SRC  R4,15
       MOVB R4,@WORK(R2)
       INC  R2
       DEC  R3
       JNE  AW1
       RT
In all, I have 13 patterns being animated, and 2 colors. In order to minimize VDP access, all animated tiles are located in the same block, from patterns 128-142. Color animations are also side-by-side so that they can be read in a single multiple-byte sequence. By limiting myself to 2-4 VDP accesses in the interrupt, I stay well under my 1/60 timeframe.
* Data and addresses used
WS     EQU  >8300
CLOCK  BSS  2
WORK   BSS  128
INTLOC DATA USRINT
WHIRL  DATA >B26D,>55AA,>A59B,>66B9
       DATA >B946,>DBA5,>AA56,>69B6
       DATA >9D66,>D9A5,>55AA,>B64D
       DATA >6D96,>6A55,>A5DB,>629D

* Start of program
START  LWPI WS
       MOV  @INTLOC,@>83C4
* Program continues here...

* User-interrupt hook
USRINT BLWP @COUNT
       BLWP @ANIME
       RT

* Clock Interrupt routine
COUNT  DATA WS,CT1
CT1    INC  @CLOCK
       RTWP

* Animation routine
ANIME  DATA WS,AM1
AM1    MOV  @CLOCK,R1
       ANDI R1,>0001           ; If 1/30 of a second hasn't passed, skip animation
       JEQ  AM15
       RTWP
AM15   LI   R0,>2468           ; Retrieve color data from VDP memory
       LI   R1,WORK
       LI   R2,16
       BLWP @VMBR
       CLR  R1                 ; Change color patterns
       BL   @ANORTH
       LI   R1,8
       BL   @ANORTH
       LI   R0,>2468           ; Write altered color patterns back to VDP
       LI   R1,WORK
       LI   R2,16
       BLWP @VMBW
       LI   R0,>0400           ; Retrieve pattern data from VDP memory
       LI   R1,WORK
       LI   R2,104
       BLWP @VMBR
       LI   R1,64              ; Animate waterfalls
       BL   @ASOUTH
       LI   R1,72
       BL   @AWEST
       LI   R1,80
       BL   @ANORTH
       LI   R1,88
       BL   @AEAST
       MOV  @CLOCK,R1          ; Check if 2/15 of a second has passed
       CLR  R0
       DIV  @W8,R0
       MOV  R1,R1
       JEQ  AM2                ; If so, go to next set of animations
AMEND  B    @AM7
AM2    MOV  R0,R7
       ANDI R7,>0003
       LI   R1,24              ; Rotate whirlpool
       BL   @AROT
       LI   R1,32              ; Animate rivers
       BL   @ASOUTH
       LI   R1,40
       BL   @AWEST
       LI   R1,48
       BL   @ANORTH
       LI   R1,56
       BL   @AEAST
       CI   R7,3
       JNE  AM25
       CLR  R1
       BL   @ASOUTH            ; Animate water and ocean tiles, checking
       BL   @AEAST             ; for direction
       LI   R1,8
       BL   @ASOUTH
       BL   @AEAST
       JMP  AM3
AM25   CI   R7,2
       JNE  AM26
       CLR  R1
       BL   @ASOUTH
       BL   @AWEST
       LI   R1,8
       BL   @ASOUTH
       BL   @AWEST
       JMP  AM3
AM26   CI   R7,1
       JNE  AM27
       CLR  R1
       BL   @ANORTH
       BL   @AWEST
       LI   R1,8
       BL   @ANORTH
       BL   @AWEST
       JMP  AM3
AM27   CLR  R1
       BL   @ANORTH
       BL   @AEAST
       LI   R1,8
       BL   @ANORTH
       BL   @AEAST
AM3    MOV  @CLOCK,R1          ; Check if 8/15 of a second has passed
       CLR  R0
       DIV  @W32,R0
       MOV  R1,R1
       JNE  AM7
       MOV  R0,R7              ; If so, animate lava
       ANDI R7,>0003
       LI   R1,16
       ANDI R0,>0001
       JEQ  AM35
       BL   @ANORTH
       JMP  AM36
AM35   BL   @ASOUTH
AM36   LI   R1,96
       CI   R7,3
       JNE  AM4
       BL   @ASOUTH
       BL   @AEAST
       JMP  AM7
AM4    CI   R7,2
       JNE  AM5
       BL   @ASOUTH
       BL   @AWEST
       JMP  AM7
AM5    CI   R7,1
       JNE  AM6
       BL   @ANORTH
       BL   @AWEST
       JMP  AM7
AM6    BL   @ANORTH
       BL   @AEAST
AM7    LI   R0,>0400           ; Write pattern data back to VDP
       LI   R1,WORK
       LI   R2,104
       BLWP @VMBW
       RTWP

ANORTH MOVB @WORK(R1),R0
       MOV  R1,R2
       MOV  R2,R3
       INC  R3
       LI   R4,7
AN1    MOVB @WORK(R3),@WORK(R2)
       INC  R2
       INC  R3
       DEC  R4
       JNE  AN1
       MOVB R0,@WORK+7(R1)
       RT

ASOUTH MOVB @WORK+7(R1),R0
       MOV  R1,R2
       AI   R2,7
       MOV  R2,R3
       DEC  R3
       LI   R4,7
AS1    MOVB @WORK(R3),@WORK(R2)
       DEC  R2
       DEC  R3
       DEC  R4
       JNE  AS1
       MOVB R0,@WORK(R1)
       RT

AEAST  LI   R3,8
       MOV  R1,R2
AE1    MOVB @WORK(R2),R4
       SWPB R4
       MOVB @WORK(R2),R4
       SRC  R4,1
       MOVB R4,@WORK(R2)
       INC  R2
       DEC  R3
       JNE  AE1
       RT

AWEST  LI   R3,8
       MOV  R1,R2
AW1    MOVB @WORK(R2),R4
       SWPB R4
       MOVB @WORK(R2),R4
       SRC  R4,15
       MOVB R4,@WORK(R2)
       INC  R2
       DEC  R3
       JNE  AW1
       RT

AROT   MOV  R7,R3
       SLA  R3,3
       LI   R4,4
AR1    MOV  @WHIRL(R3),@WORK(R1)
       INCT R1
       INCT R3
       DEC  R4
       JNE  AR1
       RT
One thing you may have noticed, especially if you played around with my work disk, is that when there's disk accesses, the animations stop. Interrupts are, apparently, not processed while doing DSRLNK activities. This is one reason I don't intend having in-game music; having a single note suddenly "stuck" while accessing a file makes me wince.
So that covers graphics and animation pretty well. Next month we'll look at the character creation system.